Group Consolidations - Multiple Entities
The Consolidation page lets you combine the financials of multiple entities into a single, unified group view. Configure the entities, the unified chart of accounts, FX translation rates, intercompany eliminations, and any consolidation adjustments, then run the consolidation to produce a clean group-level set of financial statements.
Why this matters
If you operate as a group of companies, a single-entity view will only ever tell part of the story. Group Consolidations rolls up every entity into one set of statements, applies FX translation across currencies, eliminates intercompany activity, and lets you post group-level adjustments. The output is a defensible group view you can hand to a board, a lender, or an auditor without rebuilding it manually in Excel each period.
When to use this
- When closing the books at the group level after each entity has finalized its own period
- When preparing group financial statements for board, lender, or audit purposes
- When stress-testing a forecast at the group level (rather than per entity)
- When onboarding a new subsidiary into an existing consolidation group
Before You Start
Make sure you have:
- At least two companies connected in your workspace (via Xero, QuickBooks, Excel, Synergix, or Demo data)
- Each entity's chart of accounts reviewed in Setup, Chart of Accounts
- Each entity's reporting currency set in Setup, Company Profile
- Ownership percentages and consolidation methods (Full Consolidation, Equity Method, etc.) decided for each entity
Step 1. Open the Consolidation Page
There are two ways to reach Consolidation:
- From the sidebar, click Consolidation.
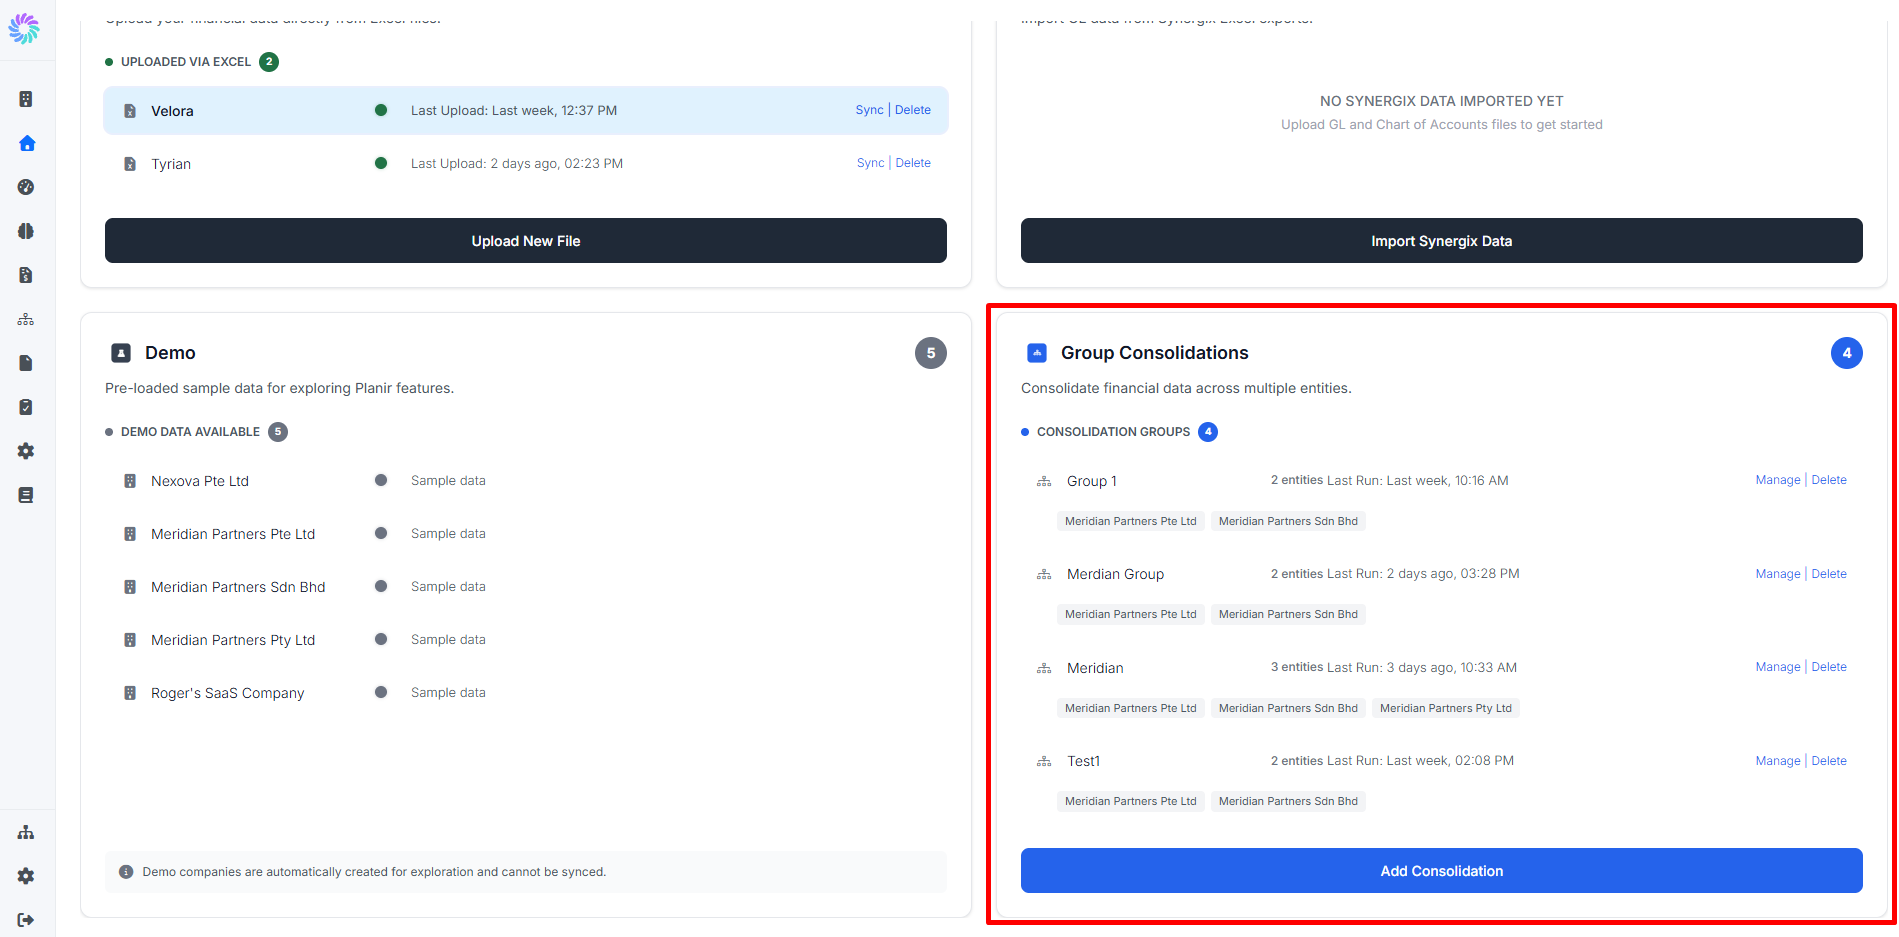
- From the Home page, scroll to the Group Consolidations tile in the bottom right and click Create Group (or open an existing group from the list).
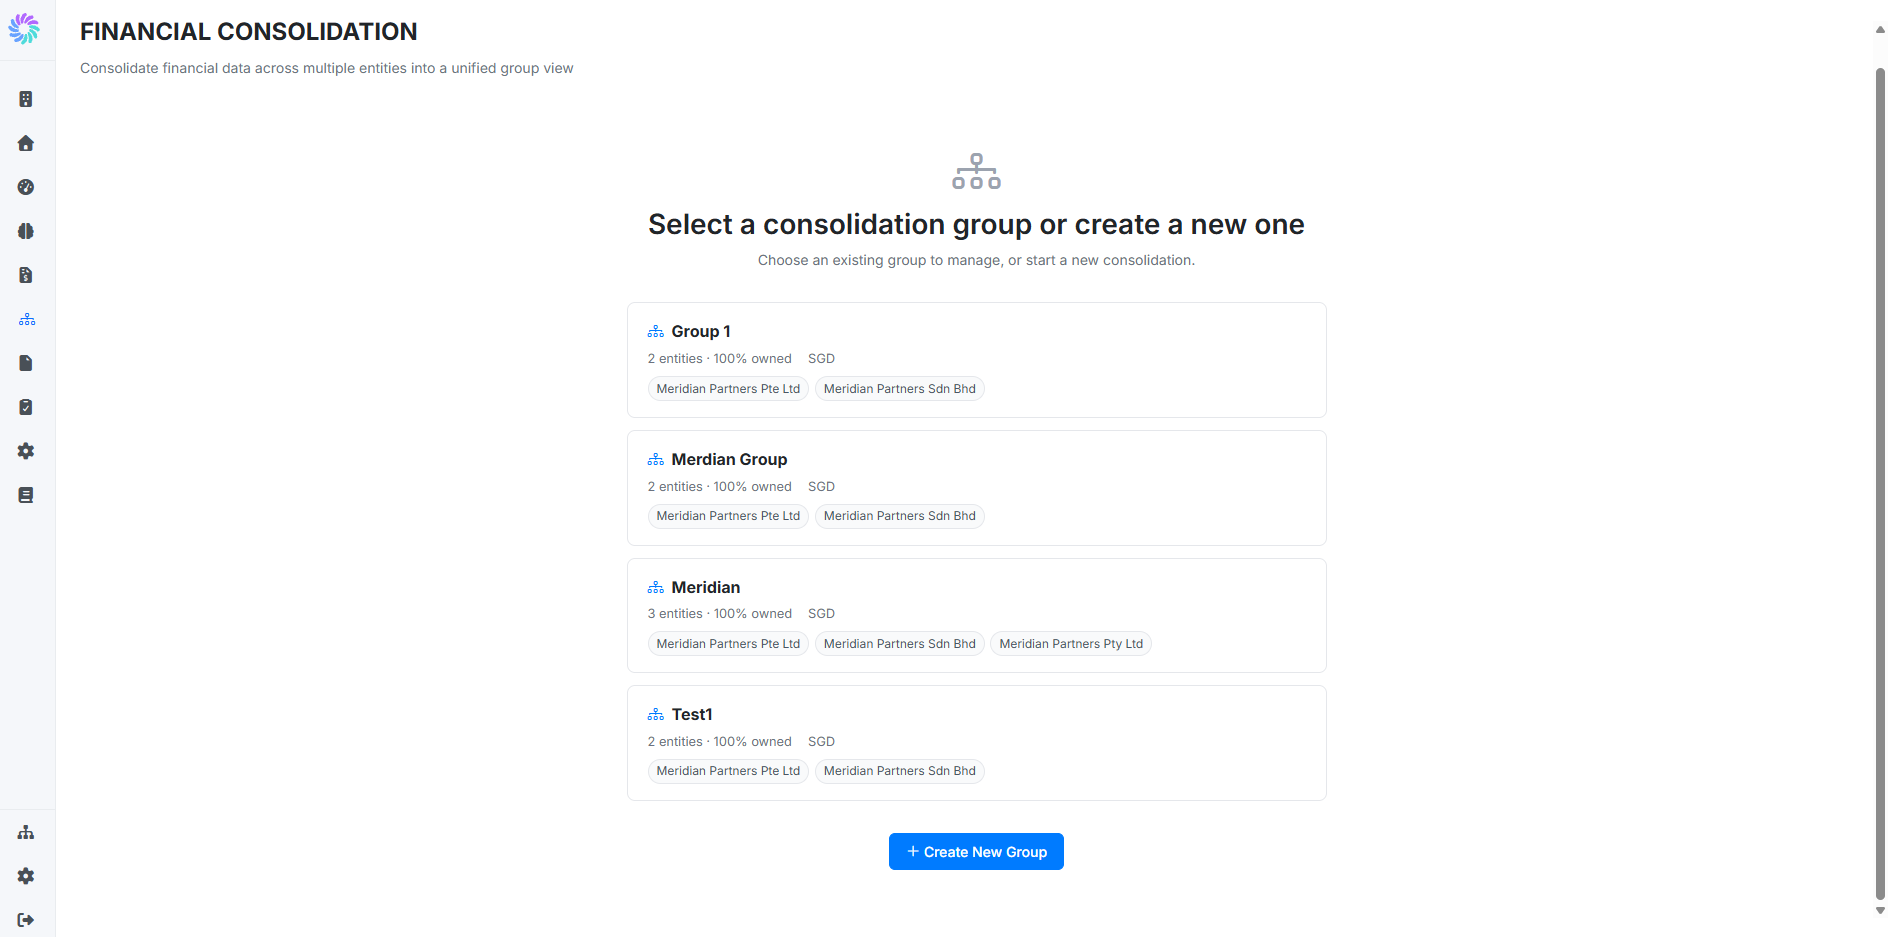
If no groups exist yet, the page invites you to start a new consolidation.
Step 2. Start a New Group and Select Entities
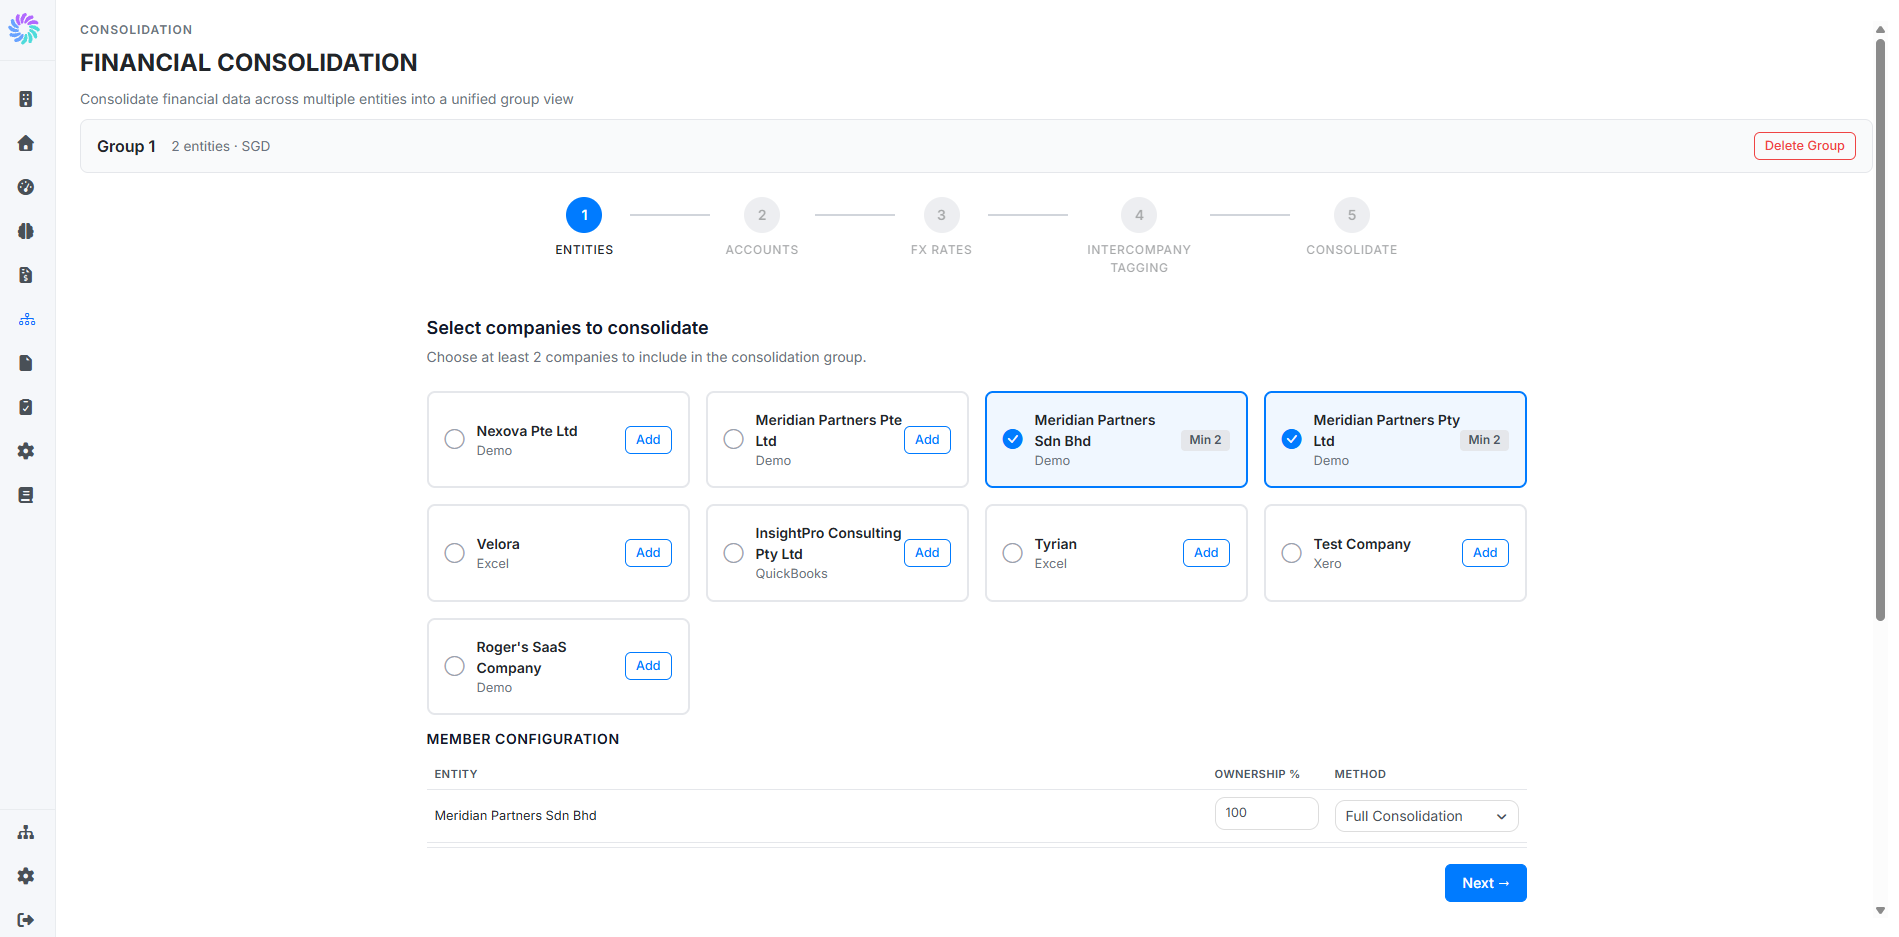
Click + Create New Group to open the consolidation wizard. The wizard has five stages: Entities, Accounts, FX Rates, Intercompany Tagging, Consolidate.
In the Entities stage:
- Select at least two companies to include in the group. Each company card shows its name and source (QuickBooks, Excel, Synergix, Demo, Xero, etc.).
- Under Member Configuration, set each selected entity's:
- Ownership % (typically 100 for wholly-owned subsidiaries, less for partial ownership)
- Method (Full Consolidation, Equity Method, etc.). Full Consolidation rolls up 100% of assets, liabilities, equity, and P&L line-by-line with no minority interest.
- Enter a Group Name.
- Set the Reporting Currency for the consolidated view. Each entity's local-currency data will be translated into this currency using the FX rates configured in the next stage.
- Set the Fiscal Year Start for the group.
- Set Consolidate From to the first period the group should produce consolidated results for.
- Click Next.
Step 3. Review the Unified Chart of Accounts
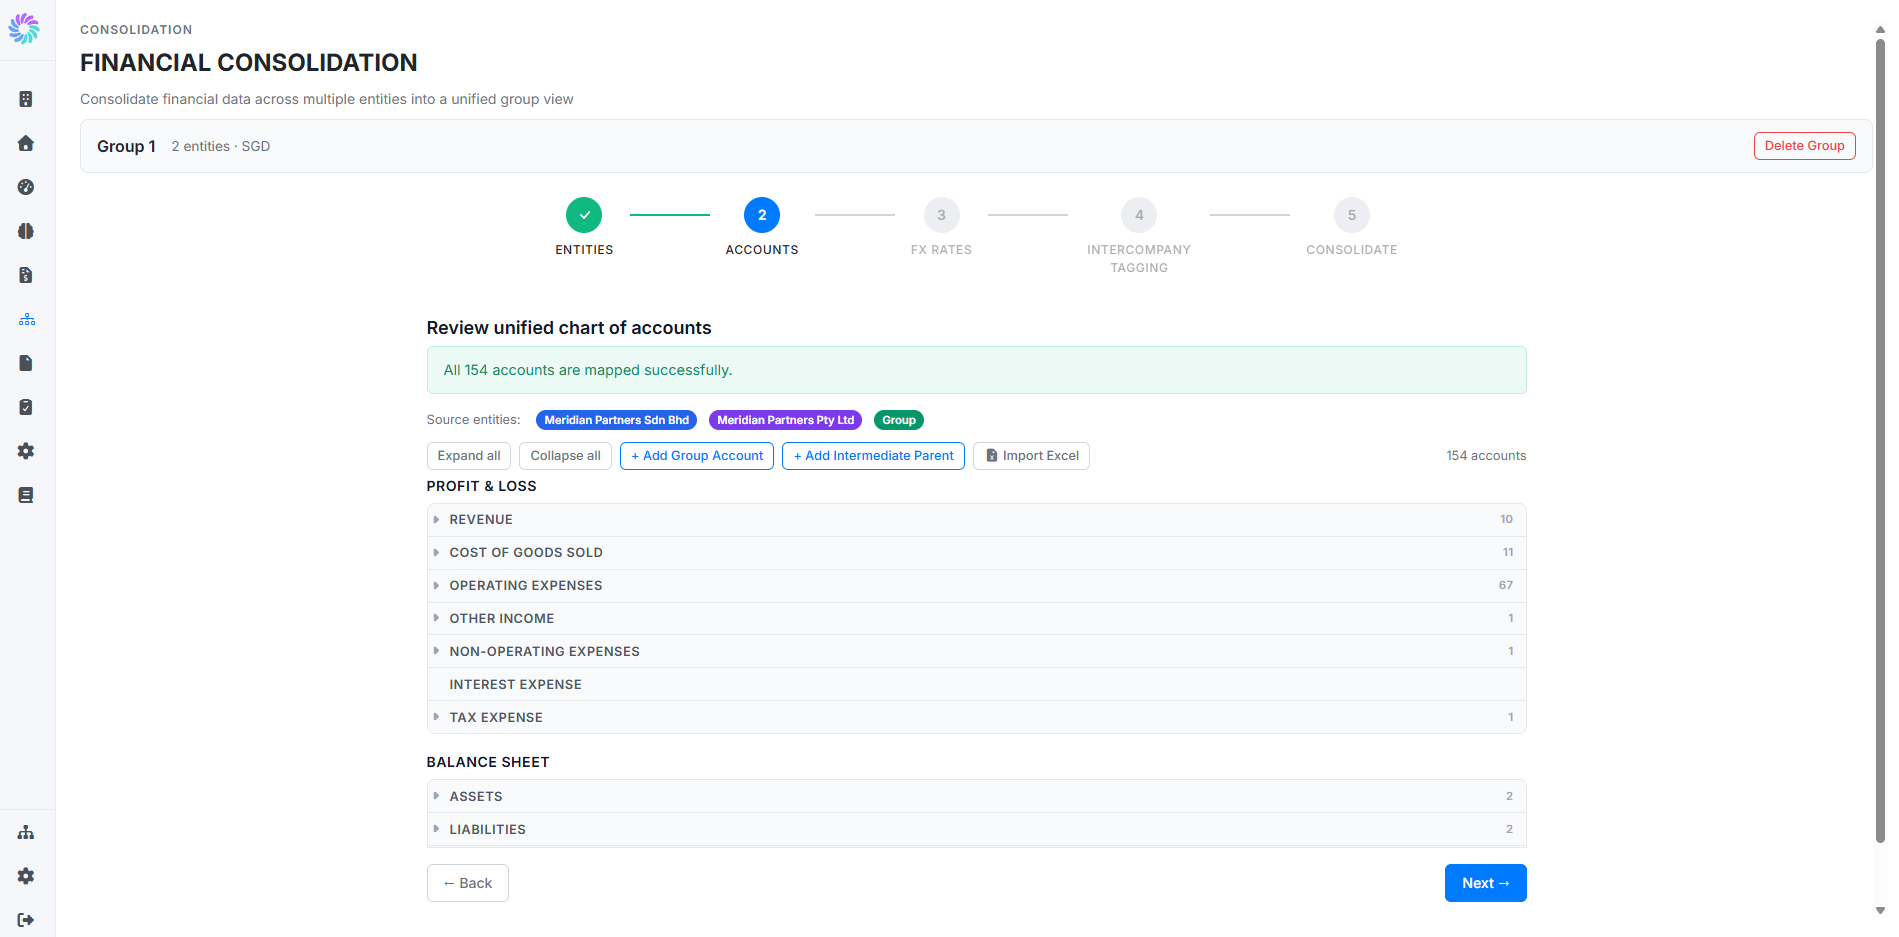
In the Accounts stage, Planir automatically merges each entity's chart of accounts into a unified group chart, mapping like accounts together where it can.
The page shows:
- A confirmation message of how many accounts were mapped (for example, "All 102 accounts are mapped successfully.")
- Source entity tags so you can see which accounts came from which entity
- Expand all / Collapse all controls to navigate the structure
- + Add Group Account to introduce a new account that exists only at the group level
- + Add Intermediate Parent to insert a new grouping category
Walk through Profit & Loss (Revenue, Cost of Goods Sold, Operating Expenses, etc.) and Balance Sheet (Assets, Liabilities, Equity) to confirm the structure looks right. Click Next when ready.
Step 4. Configure FX Translation Rates
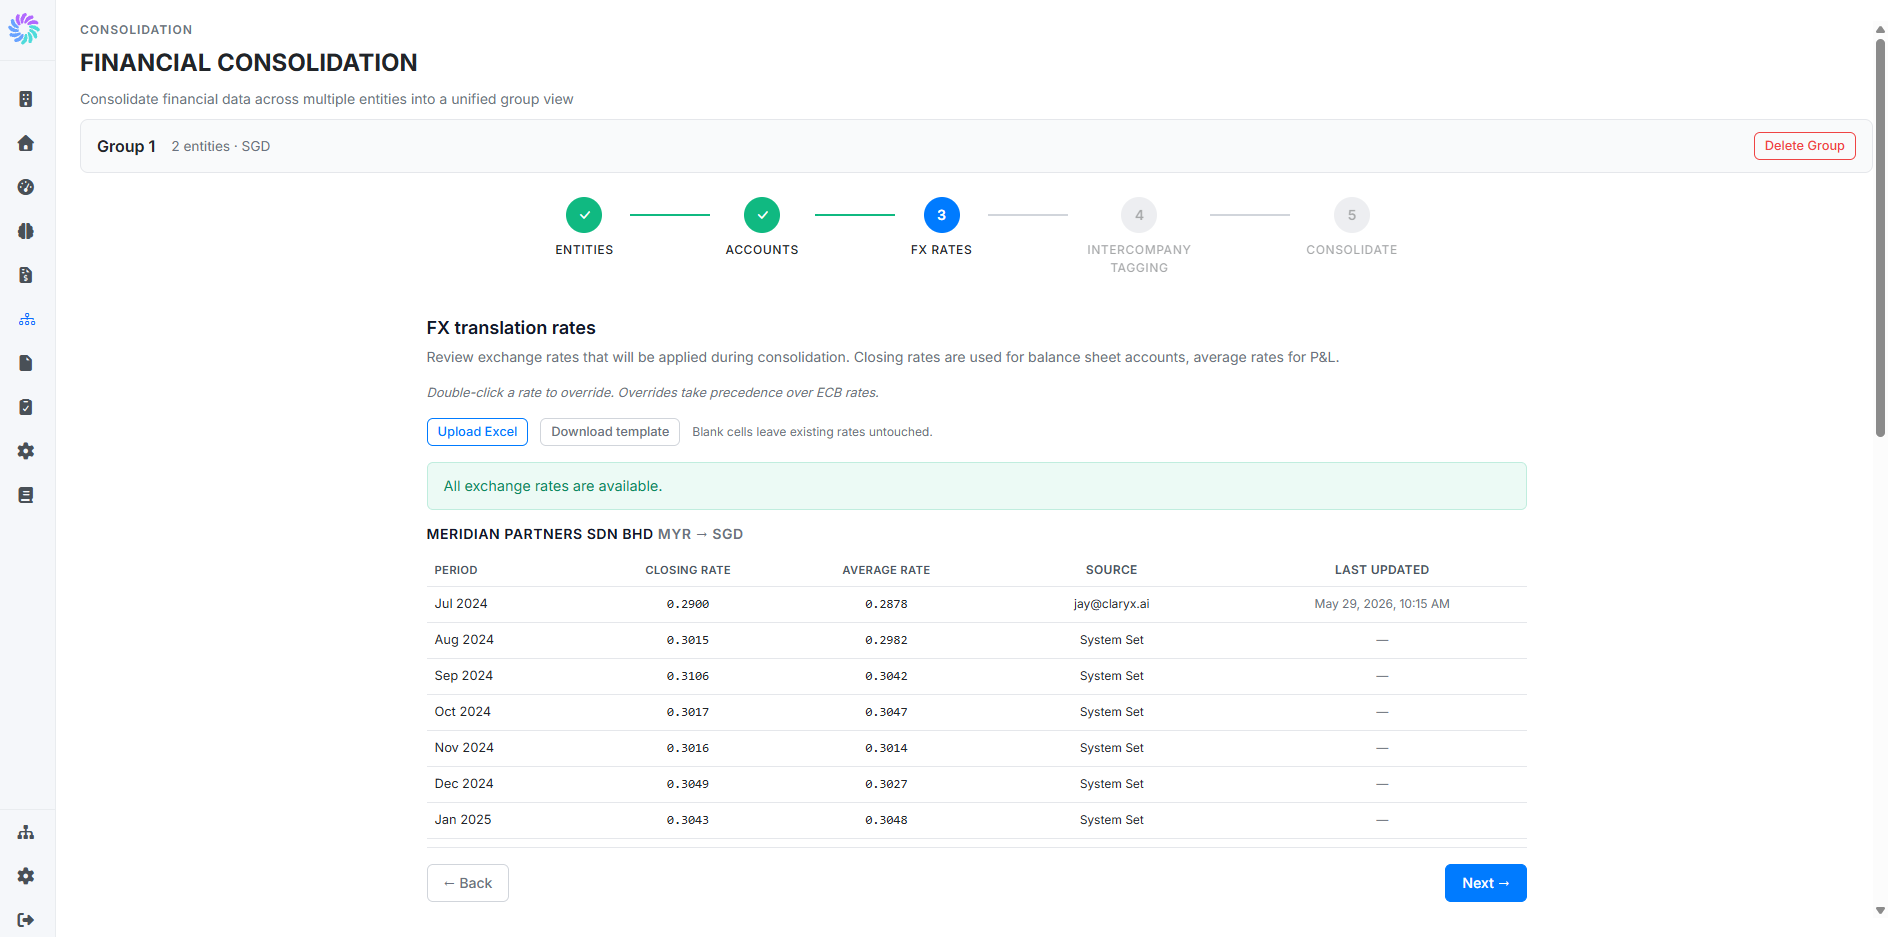
If your entities report in different currencies, the FX Rates stage shows the exchange rates that will be applied when translating each entity's local-currency data into the group's reporting currency.
Key things to know:
- Closing rates are used for Balance Sheet accounts; average rates are used for P&L accounts. This is standard accounting practice.
- Default rates come from the European Central Bank (ECB). The Source column tells you whether each rate is System Set (from ECB) or a manual override.
- Double-click a rate to override it. Overrides take precedence over ECB rates.
- Upload Excel lets you bring in a bulk set of overrides. Use Download template to get the correct format.
- Blank cells in the upload leave existing rates untouched.
The "All exchange rates are available." confirmation appears when every period has rates ready. Click Next when ready.
Step 5. Tag Intercompany Accounts
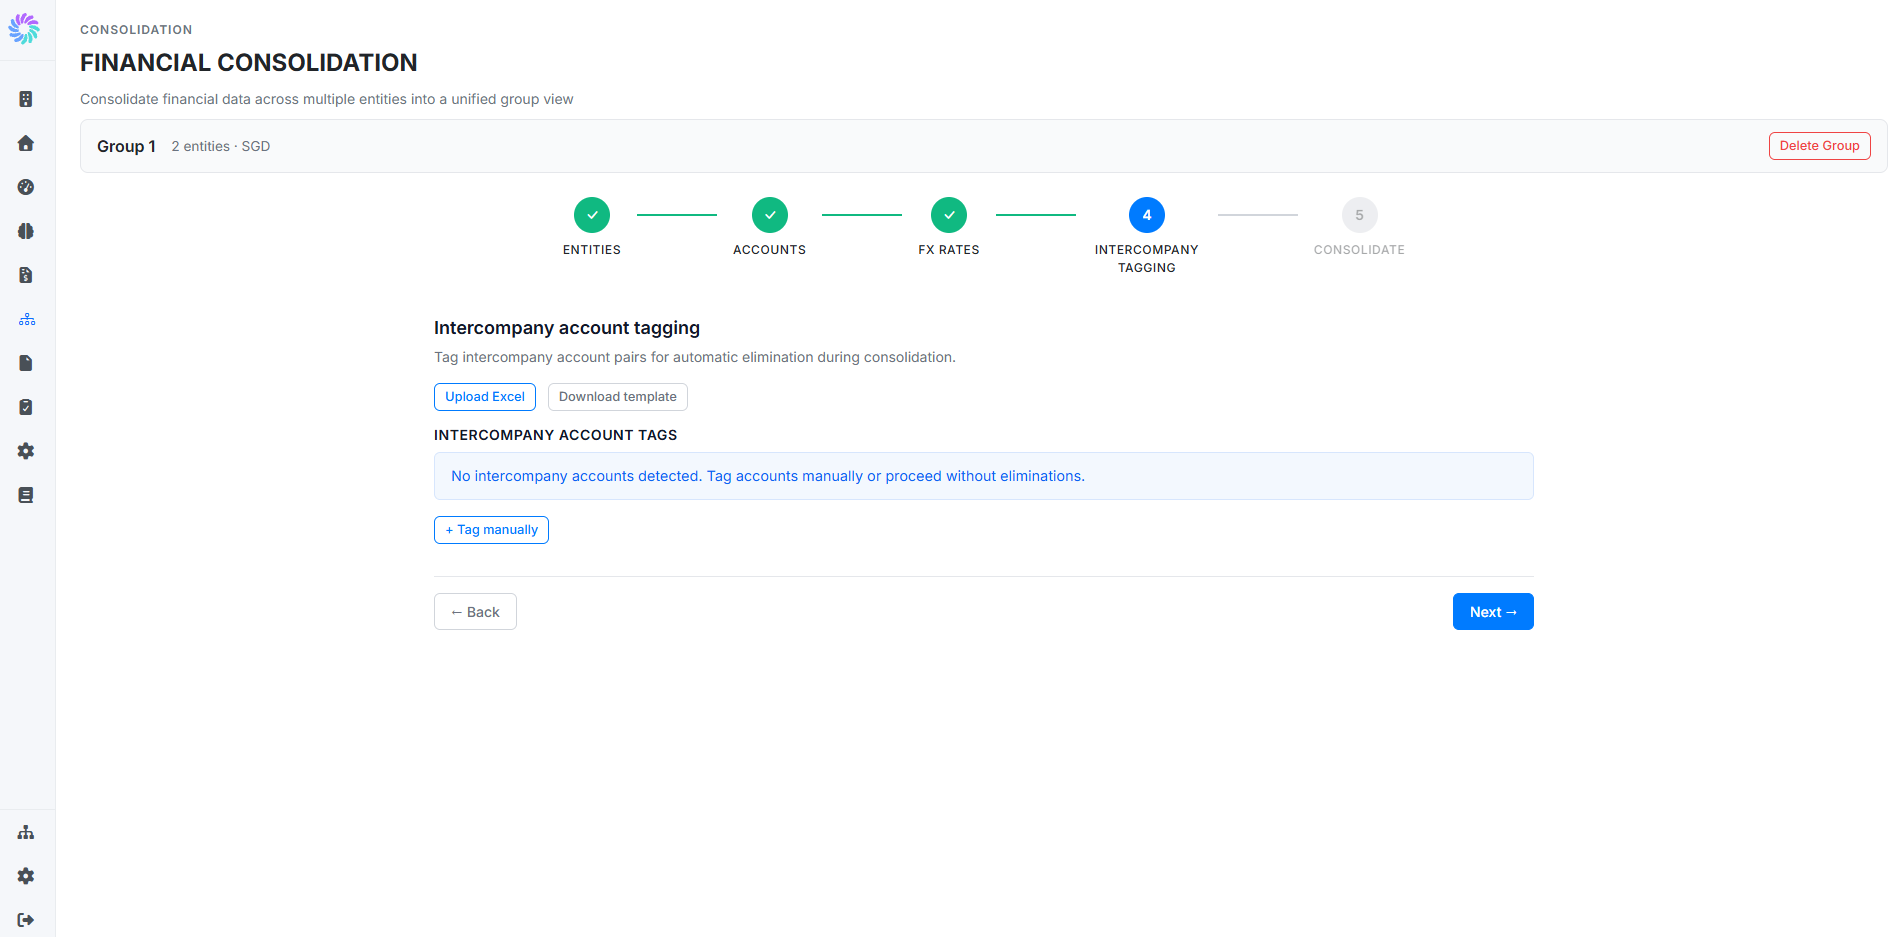
If entities in the group transact with each other, those intercompany balances and transactions need to be eliminated during consolidation so they do not double-count. The Intercompany Tagging stage is where you identify which accounts contain intercompany activity.
Two ways to tag:
- + Tag manually: pair up specific accounts (for example, "Loan from Parent" on the subsidiary's books with "Loan to Subsidiary" on the parent's books).
- Upload Excel: bulk upload intercompany pairs using the template.
If your group does not have intercompany activity, you can proceed without eliminations. Planir will show "No intercompany accounts detected" and let you continue. Click Next when ready.
Step 6. Run the Consolidation
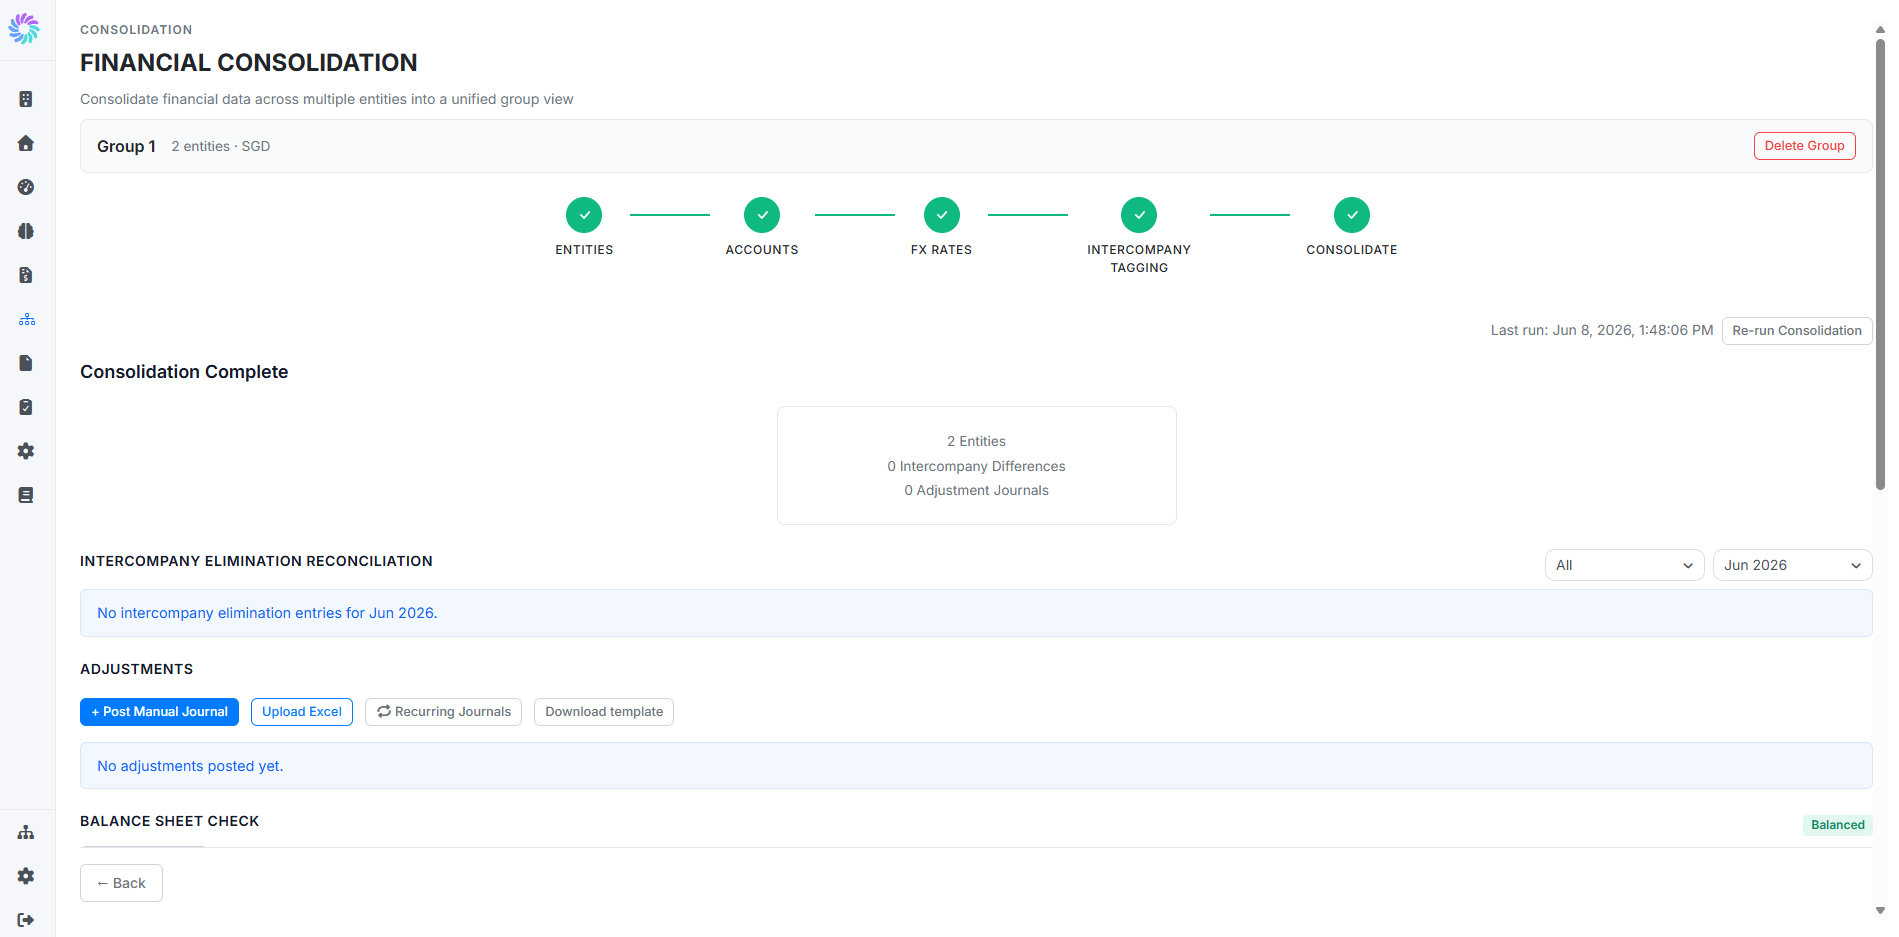
The final stage, Consolidate, runs the consolidation engine: rolling up entity data, translating FX, eliminating tagged intercompany activity, and producing a unified group view.
The result page shows:
- A timestamp of the Last run with a Re-run Consolidation button to refresh
- A summary card with the entity count, intercompany differences identified, and adjustment journals posted
- Intercompany Elimination Reconciliation: lists eliminated entries by period (use the period and entity dropdowns to filter)
- Adjustments: post manual journals at the group level for things that are not already captured (for example, fair-value uplifts, group-level reclassifications). Use + Post Manual Journal for one-off entries or Upload Excel for bulk
- Balance Sheet Check: a green Balanced badge confirms the consolidated Balance Sheet ties out
Re-run the consolidation any time entity-level data changes or after posting adjustments.
Step 7. Manage and Re-run
Once a group exists, the Consolidation page becomes the home base for that group. From here you can:
- Re-run the consolidation at the click of a button after any entity-level change
- Step back through the wizard to update entities, accounts, FX rates, or intercompany tags
- Post or remove adjustment journals as needed
- Delete the group entirely using the Delete Group button at the top of the page (use with care)